Now start to post something regarding my training life
It actually would be a long post
but due to my laziness, please allowed me to separate to several parts!
I lazy to wait to pictures to upload bah! =S
Our first lesson is Motor Rewinding!
It actually would be a long post
but due to my laziness, please allowed me to separate to several parts!
I lazy to wait to pictures to upload bah! =S
Our first lesson is Motor Rewinding!
Ever seen a motor before?
How a motor look like?
Nah...Here it is..
""
"
How a motor look like?
Nah...Here it is..
""
"
 Different brands of Motor (stator) in different size!
Huge one the weight might be heavier than 100kg
How to start?
First get a burned/ broken stator like this
First get a burned/ broken stator like this
 Remove the unwanted/broken part
 Ignore that fatty hand! That is not mine! LOL
Then it will be look like this.
 Tools need as follow:
 Next is the cleaning process
Remove the residue of varnish layer on the motor
Before that should jot down the thickness of copper wire used
and also calibrate the thickness of insulated paper by using micrometer
After all, cut the insulated paper with the paper cutter like this:
 Fold the paper and insert it into the slots
the size and length of paper must fully fit the slots!
 Now the papers are finished insert into the slots
 Next step we come to rewinding coil!
The rewinding coil machine
(Notice: there also got a motor inside this machine)
Every machine need a motor to operate
Motor consider an important part of a machine
Without a motor, a machine can't work in proper way
 Go get the proper/ suitable size of copper wire
For example: 0.85mm, 1.00mm...and so on
 Then start rewinding to coil Like this:
Must hold
 Depends on the connection of the stator
(Star/ Delta/ Star-Delta)
Consider the step of the stator too
Eg: 1-8/1-10/1-8
The ready coil is now put into the slots as picture shown
 This actually the most challenging progress
since the slots provided is quite small
must push the coil into the slots
And at the end the coil is getting thicker
and will be harder to insert the coil into the slots
 There are 3 phase
separate the phases with insulated paper too like this:
 After that wrap
  Next, tie up
  Tie both bottom and upper part
Tadaa..the side image:
 Final step!
Apply the varnish all over the coil
 END Of the process to repair the stator. =)
Here i add on some pictures :
After repair the motor, i found that
....
...
..
.
My hands/ fingers get hurts
 Feel pain and sometime accidentally cut my finger!
My supervisor told me that
To become an NORMAL engineer
MUST tahan
MUST kotor
MUST kena cedera
MUST rajin
=.=||

The stators...
 This indon guy is repairing his Huge stator
With large size of coil
 This is the trolly which is use to hang/hold the BIg motor
Because too heavy, need to use this to move the motor
 Medium sized motor
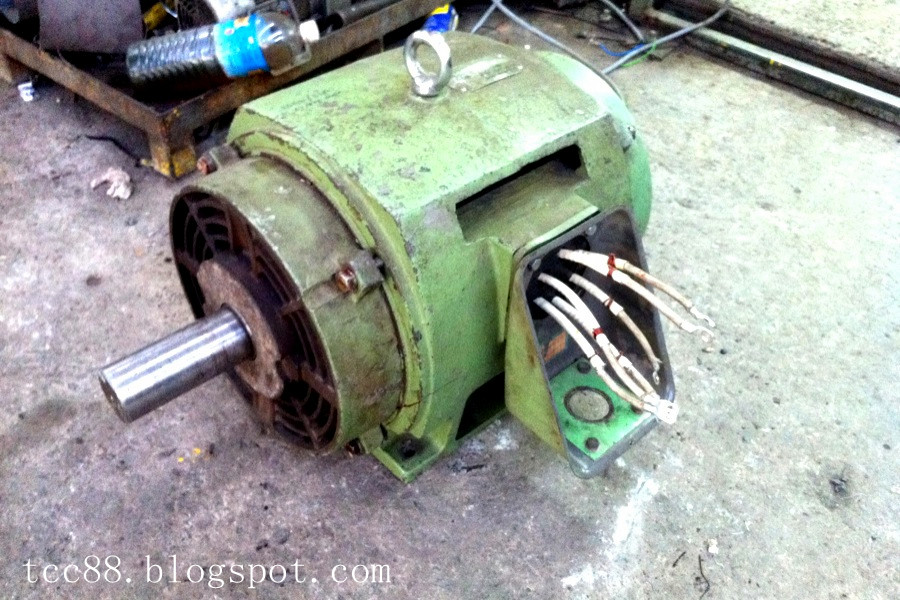 The factory..
 The forklift!
I wish someday..i can drive it! Hmmm..
 Joan on the car~~
 Stay tuned ya..
to be continue..=)
***Click my advertisements only if you like my site. =D
Thanks for every single of "click"! =)
ur wounds at ur hands, looks like very very painful...anyway~still left 4 weeks then will end our training life..:)) Jia you..and take care during training ya...be more careful so that will not get hurt anymore...:)
ReplyDeletestill left 5 weeks gua..haha. Oklah, not really pain during hurt, after i go wash hands just realize the wound is blooding and pain! >_<
ReplyDeleteThanks, you are such a caring person. =)
Do take care too.
Gambateh my dear! You can do it!
ReplyDeletewah...u reali big liao lo...any take good k la..as tcp say, u can do it d
ReplyDeleteBig ?? Where big? size badan?? haha. i admit my size is bigger than before! i got muscle now! LOL
ReplyDelete=.= Joan, 你很强啊! 原来你LI是做这些事.. 我,看不懂! 哈哈.. (看得懂还得了 =P)
ReplyDeletehaha...no la..i mean nw u prove that what boy can do d, gal also can do..haha
ReplyDelete